Web Control |
Most Web technologies offers a set of Web Controls implemented using a class that renders HTML in the Web Server. In order to expand the technology, it is possible to create custom Web Controls. They are usually derived from a class and their main purpose is to produce custom HTML according to a specific application. You should create a custom Web Control when the existing control does not fit in your application. La mayoría de las tecnologías Web ofrecen un conjunto de Controles Web implementados usando una clase que produce HTML en el Servidor Web. A fin de expandir la tecnología es posible crear controles Web personalizados. Estos son derivados usualmente de una clase y su propósito principal es producir HTML personalizado para una aplicación específica. Usted debe crear un Control Web personalizado cuando los controles existentes no se adaptan a la aplicación. |
Wintempla Web Control |
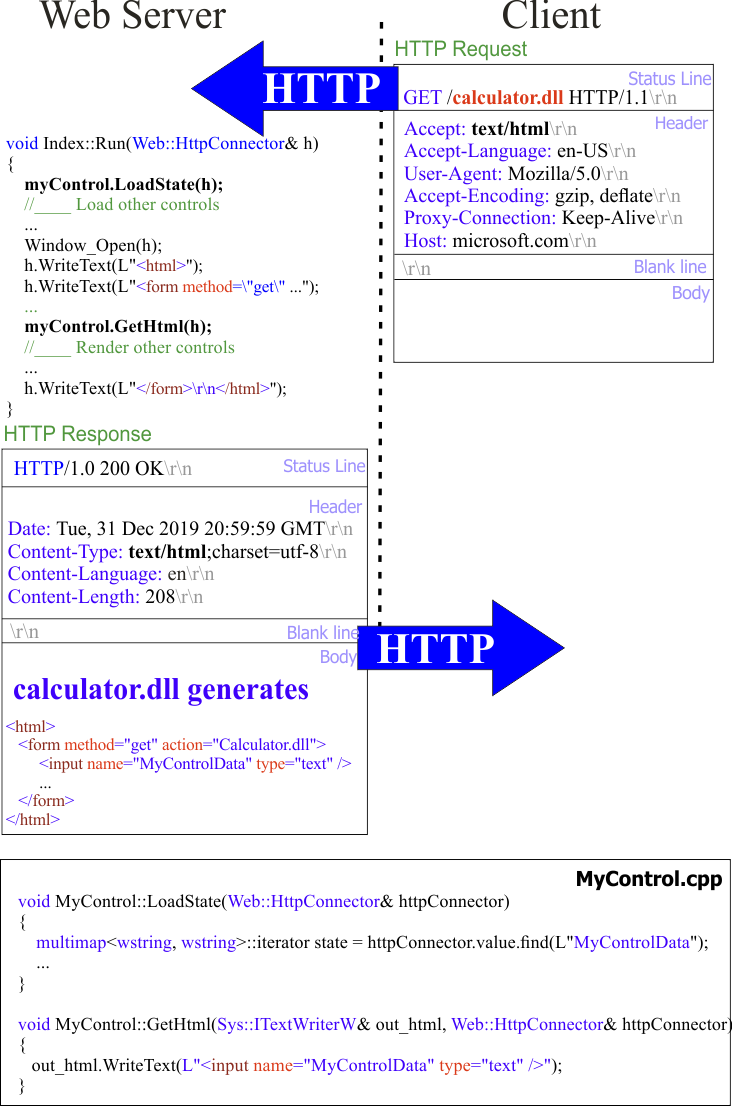
In Wintempla a custom Web Control must be derived from Web::VisibleObject and must implement four functions as shown in the figure below. You can inspect the classes inside the Web namespace to understand how to create your own Web Controls. To create a Web Control use: Tools > Add Wintempla Item... > Web Control. Once you have created a Web Control, you can insert it in any Web page by inserting a Custom Control from Wintempla Web Editor and providing the name of the respective class. En Wintempla un Control Web personalizado debe ser derivado de Web::VisibleObject y debe implementar cuatro funciones como se muestra en la figura. Usted puede inspeccionar las clases dentro del namespace Web para entender cómo crear sus propios Controles Web. Para crear un Control Web use: Tools > Add Wintempla Item... > Web Control. Una vez que usted ha creado un Control Web, usted puede insertarlo en cualquier página Web insertando un Custom Control desde el editor Web de Wintempla y proporcionando el nombre de la clase respectiva. |
Ajax and Javascript |
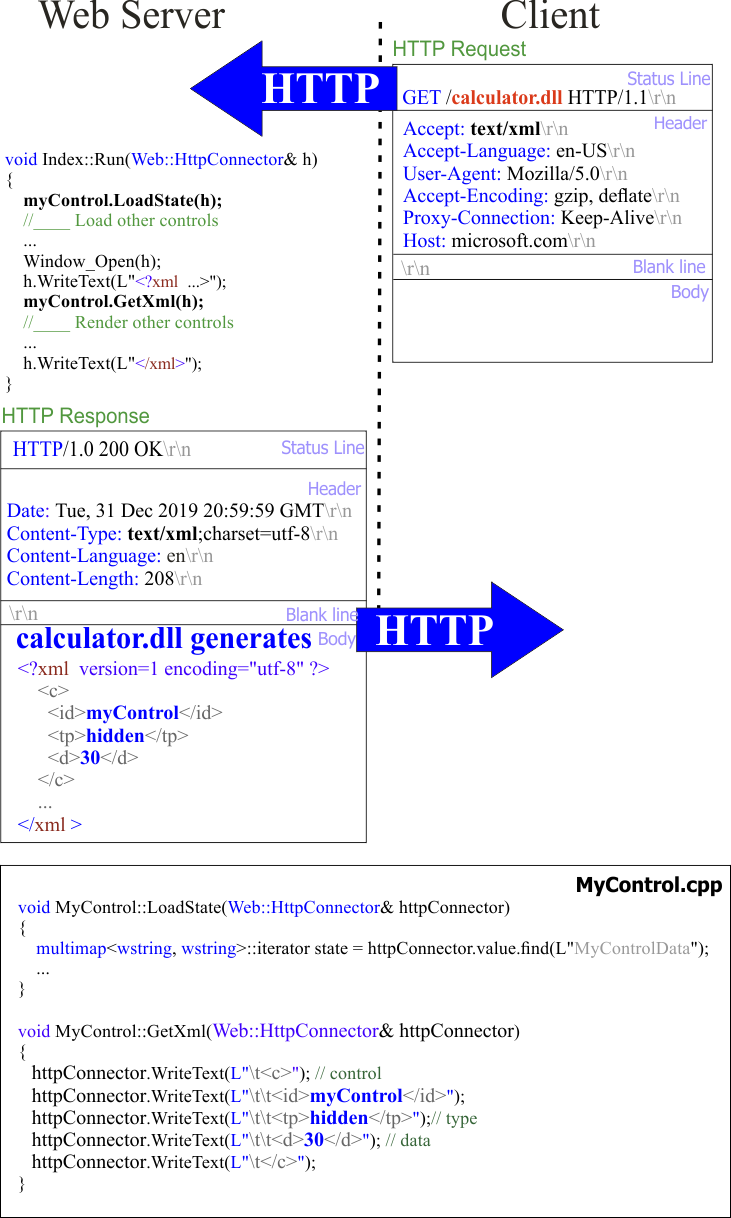
A Wintempla custom Web Control may be integrated with Ajax and Javacript by writing XML during the call of GetXml as shown in the figure below. Un Control Web personalizado de Wintempla puede ser integrado con Ajax y Javacript escribiendo XML durante la llamada a GetXml como se muestra en la figura de abajo. |
Problem 1 |
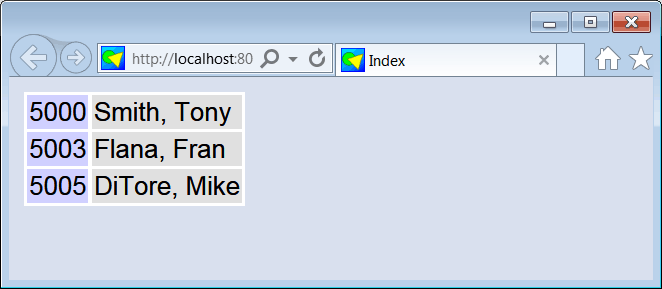
Create a IIS Web application (using Wintempla) called Circuit to display the name of the employees in the circuit_city database described in Wintempla > SQL > Sample databases . This problem illustrates how to render the data using custom HTML. Cree una aplicación Web para Microsoft IIS (usando Wintempla) llamada Circuit para mostrar el nombre de los empleados en la base de datos de circuit_city descrita en Wintempla > SQL > ODBC . Este problema ilustra como mostrar los datos usando HTML personalizado. |
Step A |
Edit the connection string in the stdafx.h file as shown. Edite la cadena de conexión en el archivo stdafx.h como se muestra. |
stdafx.h |
#define CONNECTION_STRING L"DRIVER={SQL Server};server=localhost\\SQLEXPRESS;database=circuit_city;Trusted_Connection=yes" |
Step B |
Add a Custom Web Control, from the menu of Microsoft Visual Studio: Tools > Add Wintempla Item... > Web Control . Set the name of the Web control to EmployeeCtrl. This will generate two files: EmployeeCtrl.h and EmployeeCtrl.cpp. Agregue un Control Web Personalizado, desde el menú de Microsoft Visual Studio: Tools > Add Wintempla Item... > Web Control . Fije el nombre del control Web a EmployeeCtrl. Esto generará dos archivos: EmployeeCtrl.h y EmployeeCtrl.cpp. |
Step C |
Edit the files EmployeeCtrl.h and EmployeeCtrl.cpp as shown. Edite los archivos EmployeeCtrl.h and EmployeeCtrl.cpp como se muestra |
EmployeeCtrl.h |
#pragma once //_____________________________________________ EmployeeCtrl.h #include "resource.h" class EmployeeCtrl: public Web::VisibleObject { public: EmployeeCtrl(); ~EmployeeCtrl(); wstring company; void GetHtml(Web::HttpConnector& httpConnector); void GetXml(Web::HttpConnector& httpConnector); void LoadState(Web::HttpConnector& httpConnector); void OnNavigateAway(Web::HttpConnector& httpConnector); protected: wchar_t* GetTag(); }; |
EmployeeCtrl.cpp |
#include "stdafx.h" //_____________________________________________ EmployeeCtrl.cpp #include "EmployeeCtrl.h" EmployeeCtrl::EmployeeCtrl() { } EmployeeCtrl::~EmployeeCtrl() { } void EmployeeCtrl::GetHtml(Web::HttpConnector& httpConnector) { RenderTagAndId(httpConnector); RenderClassAndStyle(httpConnector); RenderName(httpConnector); if (Enabled == false) RenderPair(L"disabled", L"disabled", httpConnector); httpConnector.WriteText(L">"); //_________________________________________________________________ Sql::SqlConnection conn; int client_id = 0; wchar_t name[64]; wchar_t text[256]; try { conn.OpenSession(NULL, CONNECTION_STRING); conn.ExecuteSelect(L"SELECT client_id, name FROM client WHERE company='Microsoft'"); conn.BindColumn(1, client_id); conn.BindColumn(2, name, 64); while (conn.Fetch() == true) { //____________________________________________ employee_id _snwprintf_s(text, 256, _TRUNCATE, L"<tr><td style='background-color: #D0D0FF'>%d</td>", client_id); httpConnector.WriteText(text); //____________________________________________ name _snwprintf_s(text, 256, _TRUNCATE, L"<td style='background-color: #E0E0E0'>%s</td></tr>", name); httpConnector.WriteText(text); } } catch (Sql::SqlException e) { httpConnector.WriteText(L"<tr><td>ERROR: EmployeeCtrl</td><td>"); httpConnector.WriteText(e.GetDescription()); httpConnector.WriteText(L"</td><tr>"); } //_________________________________________________________________ httpConnector.WriteText(L"</table>"); if (EndHtml.length() > 0) httpConnector.WriteText(EndHtml); } void EmployeeCtrl::GetXml(Web::HttpConnector& httpConnector) { } void EmployeeCtrl::LoadState(Web::HttpConnector& httpConnector) { } void EmployeeCtrl::OnNavigateAway(Web::HttpConnector& httpConnector) { } wchar_t* EmployeeCtrl::GetTag() { return L"table"; } |
Step D |
Include the EmployeeCtrl.h file in the index.h file as shown. Incluya el archivo EmployeeCtrl.h en el archivo index.h como se muestra. |
index.h |
#pragma once //_____________________________________________ Index.h #include "resource.h" #include "EmployeeCtrl.h" class Index: public Web::Page { ... }; |
Step E |
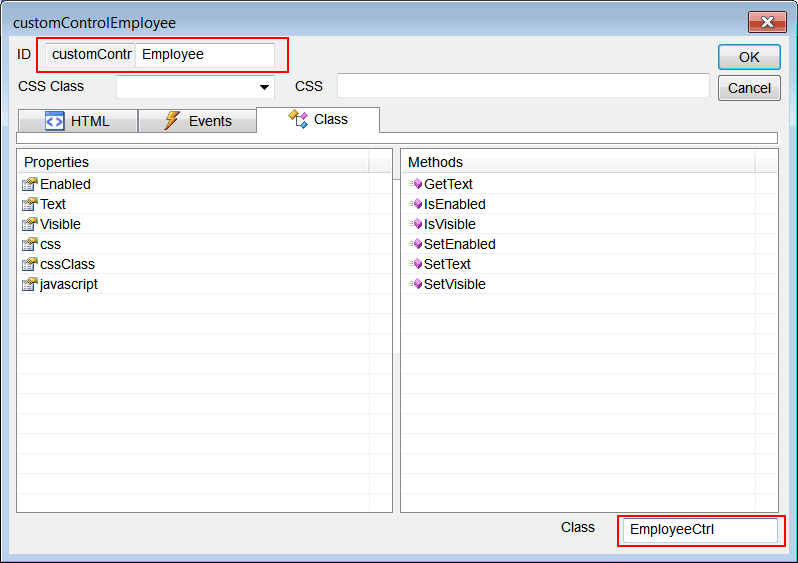
Edit the index.h file (or the index.cpp file) using Wintempla to insert a Custom Control. Click on Custom Control. After inserting the control, set the name to customControlEmployee, then click the Class tab and set the class to EmployeeCtrl como se muestra. Edite el archivo index.h (o el archivo index.cpp) usando Wintempla para inserta un Custom Control. Haga clic on Custom Control. Después de insertar el control, fije el nombre a customControlEmployee, entonces haga clic en la pestaña de Class y fije la clase a EmployeeCtrl as shown. |
Step F Edit the index.cpp file. Finally, run the program. |
Edite el archvio index.cpp. Finalmente, ejecute el programa. |
Index.cpp |
#include "stdafx.h" //_____________________________________________ Index.cpp #include "Index.h" void Index::Window_Open(Web::HttpConnector& h) { customControlEmployee.css.background_color = RGB(255, 255, 255); } |